On Sunday…it was time to tackle a quilt. My knitting project has been in the fore front and quilting has taken backstage. With the 5" squares going back to guild members on Tuesday (today), ideas for the current swap of fabrics was needed. What to do with 5" neutral charms.
")
The fabric is from a fat quarter bundle. To utilize the fabric wisely…Cut a 4 1/2" by 22" strip.
")
Here you can see the 5" neutral charm with the 4 1/2' x 5"
") Sew down both sides.
Sew down both sides.
Trim of the charm square to 4 1/2" x 5"
Cut the unit in half to make 2- 2 1/2" by 4 1/2" segments

Open and Press. There are no great pressing directions for this quilt. Here I pressed to the dark.
")
The pattern comes about by pairing these 2 blocks together. One row alternates the blocks…the next row alternates the same blocks ALL UPSIDE DOWN. Check out the pattern again for better instructions.
Surprisingly, after 10pm only a few blocks incorrectly orientated were found. They were quickly fixed and the quilt went together in less than 3 days. Borders will probably be added later to my version. The original has no borders but has another 2 rows of blocks to make the quilt wider.")
Windy out there today.
")
")
")
Stop over and check out what others are doing today at Connie's Freemotion by the River.
Happy Quilting,
Just Another Quilter
Now….Tuesday isn't far away from Sunday. So, I was looking for something that is useful and attractive. Initially I chose Rick Rack Nines from Bonnie Hunter's "Leaders and Enders" book. After making about 12 nine-patches, it dawned on me that this pattern didn't use very many of the 5" charms with lots of sewing in between. That was not my GOAL. Let's use up this fabric swap.
 |
| Bonnie's Rick Rack Nines |
Swap to a new pattern….what to choose. Out comes the Ipad. Instead of printing out every pattern that "needs" to become a quilt, I save the patterns by choosing "Opening in Ibooks". So after looking through the stash of quilts found Arignon Picnic over at Moda BakeShop. The original pattern has great diagrams, so stop over and check it out.
")
Here are how the pattern was modified to work with my fat quarter bundle and 5" charms.
The size of the final shape is 2 1/2" x 4 1/2". The 5" charm is combined with a 4 1/2" x 5" piece. Here is how to get there.The fabric is from a fat quarter bundle. To utilize the fabric wisely…Cut a 4 1/2" by 22" strip.
Subcut the strip every 5" for 4 units 4 1/2" x 5". The remaining bit of fabric…cut it up…2" squares for 9 patch leader and ender project??
")
")
Trim of the charm square to 4 1/2" x 5"
Cut the unit in half to make 2- 2 1/2" by 4 1/2" segments
Open and Press. There are no great pressing directions for this quilt. Here I pressed to the dark.
")
There are two blocks to make. Check out the original pattern for better instructions. There are 2 blocks. This is what the pattern calls the "S block". See the "s"?
")
This is the "Z block". See the "z"?
")
")
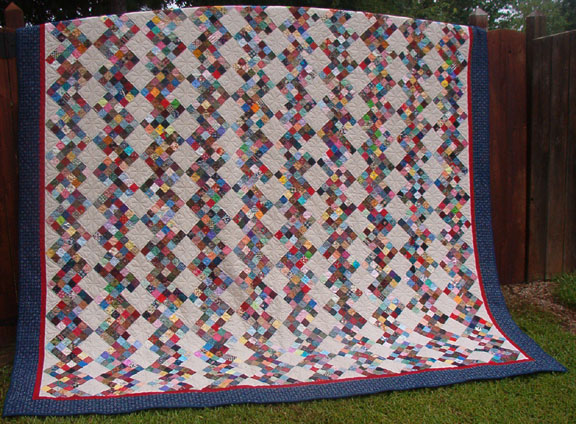
The pattern comes about by pairing these 2 blocks together. One row alternates the blocks…the next row alternates the same blocks ALL UPSIDE DOWN. Check out the pattern again for better instructions.
Surprisingly, after 10pm only a few blocks incorrectly orientated were found. They were quickly fixed and the quilt went together in less than 3 days. Borders will probably be added later to my version. The original has no borders but has another 2 rows of blocks to make the quilt wider.
")
Windy out there today.
")
")
")
Stop over and check out what others are doing today at Connie's Freemotion by the River.
Happy Quilting,
Just Another Quilter
Your quilt is beautiful, thanks for the link to the pattern.
ReplyDeleteVery pretty! Looks like a nice pattern.
ReplyDeleteYou are just too smart! I'd never figure all that out. But it turned out really pretty! ---"Love"
ReplyDeleteSuch a pretty quilt. Love the soft feel of the colors. Nice scrappy pattern
ReplyDeleteBeautiful quilt and a great way to use those charm squares. But all that S and Z stuff, I'm impressed you only ripped out a few seams. I'd probably fare much worse, but with a cat who likes to rearrange my design floor whenever I walk away, I have an extra challenge. I might keep this pattern in mind in the future, though, because it seems pretty simple...
ReplyDeleteLiking the pattern you chose and the easy way the blocks are made. I like the idea of some borders. Reminds me that I have some charm packs languishing in the cupboard.
ReplyDelete