Showing posts with label Charm Pack Ideas. Show all posts

Monday, February 15, 2021

A Charming Quilt

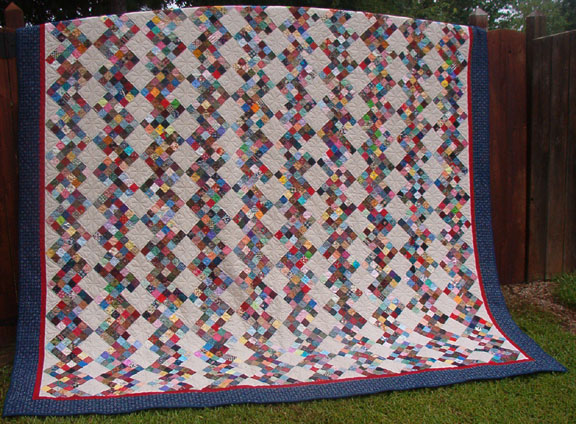
The tried and true charms came out last January.  These charms are from a swap with Black/White fabric about 6 or so years ago.  Check out the quilt made.  It is incredibly easy.

                                 
Make it look hard and not be hard....and let the fabric do some of the work.

How does the fabric do some of the work? The black/white fabrics were set into 2 piles, dark or light. The block is just a charm with a frame around 2 side
           
So lets back up, why 2 different color bolts through the quilt?  Not enough of either fabric to stick to a single choice.  As this was a retreat quilt, no additional stash available.  These 2 choices made a nice baby quilt for a unknown sex.  Designs choices on the run.  I have been working out of the stash instead of purchasing fabric.  After the piles were separated, the framing went on each.  The final blocks would finish about 6", so a 8 x 11 layout was planned. That means 88 squares.                    
To start, each pile of the light and dark charms had the 2 different frames attached.  I just sat down and sewed for awhile,  made about 15 of each category-dark charm & green border, dark charm & plaid border, light charm & green border, and light charm & plaid border.  That gave me about 60 to play with. 
                                        
It took some time to be happy.  In the end the quilt comes together with light green charm, light plaid charm, dark plaid charm, dark green charm, repeat.  The frames of like fabrics always touch and the like charms always touch.  Each row just steps to the side once.

Hope you enjoy.  It was a fast, easy and fun one to make.  Make those quilts have complexity visually....not necessarily in the construction.

For the quilting nothing more than a loop on the top side of a wavy line here and there as you go across the quilt.  This fast and easy pattern keeps light quilting, just what a baby needs.

Happy Stitching,
Just Another Quilter, Jane

Friday, March 10, 2017

Finish IT UP Friday

Life has been busy here in the Midwest.  Lots of sewing.  DH has done much traveling for work. Our life really needs to be flexible.  Not to say it is bad....Life is GOOD, but the big things in life right now seem up in the air. 

What is UP in the air....DH job (has settled since December), where is Lola living in 2 months (not where she currently does, graduates college), MJJR will not be living here in August (off to college) just to name a couple of the big ones.  DH has done some major traveling in 2017-Atlanta, Chicago, DC, and Capetown, South Africa.  I am holding down the fort.  Here in a couple weeks DH begins the busy season.

The "girls" are both graduating, college and high school, one week apart!  Family is driving 4 hours for Lola's graduation, then back home, just to drive 5 1/2 hours to watch MJJR graduate the following weekend.  Lola's move is in there.  Baccalaureate ceremony is just 1 day after Lola's ceremony. 

So with some graduations, come some quilts for the graduates. 

Here is the latest graduate finish.  It is going to a basketball player that is so kind and precious!

This is a Charm square friendly quilt by Tamarack Shack,  Four Patch Charm.  This link has a little tutorial.  Kathy also shows where her inspiration came from.  I really enjoy this blog.  Tamarack Shack is located on the shores of Schist Lake, in Northern Manitoba.  Kathy is a longarm quilter.  You get to see many great quilts along with beautiful scenery.  Most days I am happy to look at her frozen lake vs. mine.  You can see the water behind this quilt.  The sugar maple on the right is just starting to bud out.  If your eyes cannot see it, my allergies will confirm it.

The next project is started....a repeat of an earlier quilt.  The Caribbean Blue Sea now lives in the Chicago area with our great niece (not a 2013 grad as planned, the recipient decided not to come to the graduation party-her loss).  A replica is now going to show off the applique for a presentation in July.  This time pink/rose/peaches.  Do you think it might get a "Design Wall Monday"???

Check out others work at Crazy Mom Quilts.

Happy Quilting
Just Another Quilter

Saturday, December 31, 2016

Last Minute Finishes

The year is quickly coming to an end.  The quilting that was done isn't always seen here.  We have neighbors with new babies.   So far all new babies in the neighborhood receive a quilt close to birth.  These are no exception.
The newest one, coming any day, is a girl.  This Fat Quarter Shop quilt is cute and quick.  Charm Box is demonstrated on YouTube by Kimberly.
This is slightly bigger and probably should have added an inner border-yellow or black.  The sides of the outside border were already on and cut to size before the thought crossed my mind.

The second quilt is for another neighbor.  This one you guys checked out in progress earlier.  This quilt is the Cozy Quilt Design Strip Club-Blurred Lines.  Here is the YouTube video.  No measurements given except 2 1/2" strips.  The accent pieces are probably larger in this quilt than the original.  The baby boy's dad is a veteran and the fabric is leftover from my stepdad's QOV.
Thanks for stopping by in 2016.  Next year will have some monumental moments.  MJJR graduates from high school.  Lola will graduate from college.  DH will hopefully retire.  That leaves us free as a  bird as our nest will be empty.  Some of the long time blogging buddies, I may be in your part of the country/world.......

Happy New Year
Just Another Quilter

Tuesday, March 8, 2016

Scraptastic Tuesday

Yesterday the last stitch was put in the binding. The sleeve was put on and hung up in the sew room. Late last night. It looks great in there. Enjoyed a little Netflix while it was hanging last night.

I didn't take a picture in natural light before it was hung.....so this morning down it came. The sun was beautiful this morning. 

It was quilted on the long arm, which I still am growing accustomed to. Since the quilt was going in my sew room I decided that it was an opportunity to practice some new designs. The quilt was sectioned off with double lines and loops. Each section has a different pattern. It gives some practice without a huge commitment. 

The quilt is made with blocks cut with the Accuquilt drunkards path block and 5" batik squares. The 5" squares are from the guild fabric exchange in February 2015. 

Check out the other projects at Connie's Linky Tuesday and with Mrs Sew & Sow Scraptastic Tuesday.

Happy Quilting,
Just Another Quilter

Monday, January 4, 2016

Design Wall Monday

I am hoping to turn over a new leaf for 2016.  This blog has taken a back seat to life.  This isn't always a bad thing, but I am hoping to spur on some quilt finishes this year.

The design wall is full of possibilities.  Goal for this quilt:  to be finished by the first Tuesday of February.  That is our quilt guild meeting.  Most of it is done.  It won't take long to finish up.  I am hoping to get it on the long arm soon.


It is based on an idea from the web.  Possibly Angel Pingel's Cut to Pieces.  I love her book "A Quilter's Mixology".  It "seams" like I came across a cool quilt from somewhere on her site, maybe pictures from a class.  That was my inspiration for this quilt.  Our guild swapped 5" square pastel/light batiks in 2015.  This quilt just goes together great using these 5" squares as the main area of the quilt.  The leafs let me use the Accuquilt Drunkards Path Dye.  The design wall is a little small for the current size.  Stop back and let's see if I can hit that deadline. I am imagining a small dark border surrounded by another round of light squares.  Opinions please.

I am linking up with Judy L. "The Patchwork Times"-Design Wall Monday.  Go see what others are up too.

Just Another Quilter

Friday, August 7, 2015

Jewels in 3D

Here is another adventure in 5" squares.  I love to use these because: so many patterns are available free of charge, someone else has already done some of the cutting, usually you are not ending up with pieces so incredibly small it takes forever to make a decent size quilt and our guild swaps 5" squares so we have squares with a theme.

In July our guild swapped jewel tones. What is a jewel tone: turquoise, raspberry, garnet and gold just to name a few.  Mostly tone on tone prints were turned in for the swap.  These mixed well with not only my stash but also some earlier swaps.


This block is great for a beginner because of the simple framing of the 5" square and the lack of corners to meet and match.  The block is only the 5" square and the 2 shadow pieces added.  Current measurements have this quilt at 55" x 78".  The quilt required 2 strip sets.  The first set is made of a 4" strip of the shadow fabric and a 1 1/2" strip of the background fabric.  Cut the strip set into 1 1/2" strips.  This is my end and not trimmed to 1 1/2" wide.  IMG_0802 The second strip set is made with 5" strip of the shadow fabric and a 1 1/2" strip of the background fabric.  Cut the strip set into 1 1/2" strips.  IMG_0804 Place the background fabric of the strip set now measuring 5" on the top of the 5" themed square.  Sew.  Press toward the themed square. Place the shadow end of the strip set measuring 6" onto the shadow end of the partial block so the background fabric is diagonal from the other background piece.IMG_0807This is it for the blocks.  It is time to figure out where you want your blocks.  Place your blocks so the shadow is on the bottom right side of all your blocks.  Utilize your design wall (mine was a floor but is often the backside of a vinyl tablecloth) to rearrange your squares that is pleasing to the eye.  I found myself walking around the quilt so the shadow was in the appropriate place while doing this.  I chuckled at myself after walking around the quilt more than once and standing in the exact same place every time.  My quilt sashing is 3" wide.  This is the approximate size that the squares were placed apart when rearranging for color.  You decide what your quilt blocks need.  To have the ratio mine is cut 3" x 6" background to go between each block in a row.  Sew the rows together.  Then, cut 3" strip long enough to span the length of the row.  Sew strip between each row.

Please leave me ideas for borders in the comments!  The 5" blocks, well, there are just a handful left in the sew room. Added to the swap blocks were 4 fabrics from fat quarters, the leftover is only 16"x 18".  Another similar background is available and won't show if switched for the borders.  A few buddies think they may have some of the original.

Here is the fabric usage basics for 7 x 10 block layout
Shadow fabric estimated yardage: 27" (you'll be safe with a yard)

Background fabric estimated yardage:  2 2/3 yds.  Cut 9- 3" strips on the length wise grain.  Cut them to at least 56" (Remember body of quilt 55"x78").  Cut the remainder of the 3" strip down to the 3" x 6" (need 70). Cut another 3" strip.  Cut up for the rest of the 70-3" x 6" strips and then cut in half lengthwise for the 1 1/2" strip background for the strip sets.  There should be enough fabric left for a border around the body of the quilt.  These straight grain (lengthwise) pieces are more stable when left in these long sections for sashing or inner borders. 

If you make a strip set WOF for the 2 strip sets you will get 26 maybe 27 of the 1 1/2" cuts. That means 3 strip sets with some leftovers for the 70 blocks in this quilt.

The original inspiration is from Judy Martin-Newport Beach and Robert Kaufman-Shadow Box  Now….so many patterns are out there for these 3-D type quilts.  Use the fabrics you have.  Buy what you need.  Some of the patterns used fairly light shadows.  The continuity of the shadow is more important than how dark the pattern is.   The consistent part for the patterns is the shadow seems to work best if 1 1/2” wide.
                  Enjoy and use that stash!

Monday, November 10, 2014

Design Wall Monday-November 10th

The latest endeavor into the 5" squares....
  We exchanged 5" black/dark grey squares back in July.  Often I need a little time to make some decisions.  This time the inspiration came from a quick quilt another guild member made and an idea that keeps popping into the creative ways.


My original plan was to end at the black border.  The quilt would measure about 50" x 50".  It would be an appropriate size for a donation quilt to Margaret's Hope Chest.  I have donated to this group before.  There are other quilts in the pipeline and I would like to make the donation to Margaret's Hope Chest in February.  Sooo there is time.
NOW......this quilt could be sent along with another quilt to 2 beautiful great nieces for Christmas.  If a border print is added the quilts will be the same size.  Check out the other quilt, a torquoise beauty here.

Which fabric do you like?  I am leaning toward the dots on the left side...which are different from the bottom.  Or shall I call it good and save it for February?

Both nieces are not yet school age....and DH did some early Christmas shopping so the Long Arm (yes, he wore me down and I finally agreed) arrives tomorrow.  !!!   EEK!  That means it shouldn't be too bad to get another top together.  The 5" exchange this month was pastel.  These would make a great uplifting quilt for Margaret's Hope Chest.

Linking up to Judy L.'s Patchwork Times.  Check out more Design Walls.

Just Another Quilter

Tuesday, May 6, 2014

A Charming Pack of a Quilt

On Sunday…it was time to tackle a quilt.  My knitting project has been in the fore front and quilting has taken backstage.  With the 5" squares going back to guild members on Tuesday (today), ideas for the current swap of fabrics was needed.  What to do with 5" neutral charms. 
Now….Tuesday isn't far away from Sunday.  So, I was looking for something that is useful and attractive.  Initially I chose Rick Rack Nines from Bonnie Hunter's "Leaders and Enders" book.  After making about 12 nine-patches, it dawned on me that this pattern didn't use very many of the 5" charms with lots of sewing in between.  That was not my GOAL.  Let's use up this fabric swap. 
Bonnie's Rick Rack Nines
Swap to a new pattern….what to choose.  Out comes the Ipad.  Instead of printing out every pattern that "needs" to become a quilt, I save the patterns by choosing "Opening in Ibooks".  So after looking through the stash of quilts found Arignon Picnic over at Moda BakeShop.   The original pattern has great diagrams, so stop over and check it out.
DSC02864 (1024x987)
Here are how the pattern was modified to work with my fat quarter bundle and 5" charms.
The size of the final shape is 2 1/2" x 4 1/2".  The 5" charm is combined with a 4 1/2" x 5" piece.  Here is how to get there.
The fabric is from a fat quarter bundle.  To utilize the fabric wisely…Cut a 4 1/2" by 22" strip.
Subcut the strip every 5" for 4 units 4 1/2" x 5".  The remaining bit of fabric…cut it up…2" squares for 9 patch leader and ender project??
DSC02867 (1024x768)

Here you can see the 5" neutral charm with the 4 1/2' x 5"
DSC02869 (1024x768)
Sew down both sides.
Trim of the charm square to 4 1/2" x 5"
Cut the unit in half to make 2- 2 1/2" by 4 1/2" segments

Open  and Press.  There are no great pressing directions for this quilt.  Here I pressed to the dark.


DSC02871 (768x1024)

There are two blocks to make.  Check out the original pattern for better instructions.  There are 2 blocks.  This is what the pattern calls the "S block".  See the "s"? DSC02872 (1024x969)
This is the "Z block".  See the "z"?


DSC02873 (1024x1014)


The pattern comes about by pairing these 2 blocks together.  One row alternates the blocks…the next row alternates the same blocks ALL UPSIDE DOWN.  Check out the pattern again for better instructions. 
Surprisingly, after 10pm only a few blocks incorrectly orientated were found.  They were quickly fixed and the quilt went together in less than 3 days.  Borders will probably be added later to my version.  The original has no borders but has another 2 rows of blocks to make the quilt wider.   DSC02862 (1024x758)
                                                   Windy out there today.
DSC02863 (1024x768)DSC02861 (1024x692)DSC02860 (1024x768)
Stop over and check out what others are doing today at Connie's Freemotion by the River.
Happy Quilting,
Just Another Quilter